ghini
I have put this page
together as I have found ghini (and bauble its predecessor) very useful in
cataloguing my own small collection of plants.
I hope that it may encourage others to use, or at least
try it, too.
ghini and its predecessor bauble have been hidden away for too
long!.
This is taken from the
beginning of the documentation page...
Ghini is an application for managing botanical
specimen collections. With it you can create a
searchable database of plant records.
bauble was started many years ago as an
application to catalogue
plants at Belize
Botanical Gardens so perhaps seems a bit over the
top for gardeners and collectors at home but that is
definitely not the case.
The application can
record an immense amount of data on any plant. Many of
the included fields will be useful to gardeners and
collectors, along with the ability to add notes
providing, for example, a history of the life of each
plant.
Installation and general
usage is set out in the above linked documentation but
I will run through my installation and usage so far,
step by step.
(Note that all images are
links for viewing at full size if required.)
Installation
I have performed three or
four installs here on debian and raspbian (Raspberry
Pi) systems and generally they have been successful as
described in the documentation, however my last on a Pi
was not so smooth but cured by installing python-all and python-all-dev - a bit overkill
perhaps!
As well as linux,
installation instructions are given for Windows and
Mac. I have no experience of these but the instructions
look to be comprehensive.
The application builds
during the install process and is automatically
installed into a virtual environment in the user's home
directory. The resulting application is run from a
script in the /bin
directory, again within the user's home directory.
First run
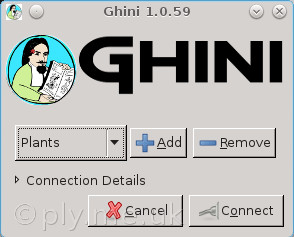
| On first running ghini (./bin/ghini in linux and run
./bin/ghini -u to
update to the latest version) we are presented
with a dialogue window similar to the one on the
right although this image is of my own populated
database named Plants. |
 |
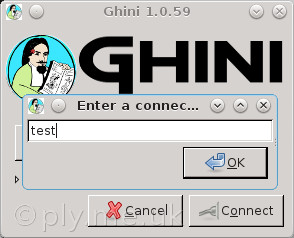
Creating a new database
called test after
clicking the Add button.
(The procedure is similar when creating our
initial test
database.) |
 |
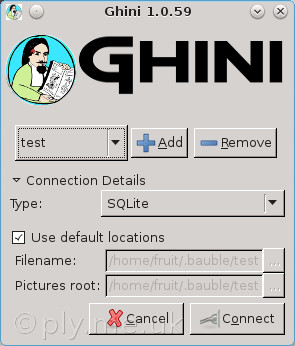
The result of clicking
OK in the previous dialogue which shows
our new database name and gives us a choice of
database back-end to choose from (choice may
depend on what you have installed on your own
system).
For this exercise we will leave the default
choice of SQLite.
SQLite is fairly easy to manage, very easy to
backup or copy to another machine/location eg.
for use on a portable device.
We will also leave Use default locations
as suggested. |
 |
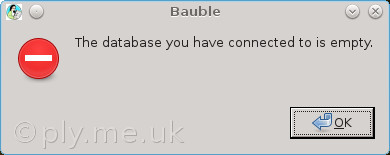
| Clicking Connect
produces a warning that we have an empty
database, clicking OK here brings up a new
dialogue. |
 |
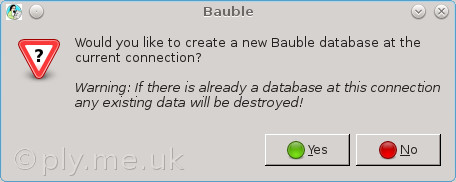
Clicking Yes here will
create and populate our new database with the
program's defaults including many Families
and Genera[1]. It may take some
seconds for this operation to complete.
We will also be asked to fill in
Institution details but this only requires
the basics in order to continue eg. Home.
If we enter an email address and click
Register we will receive a single welcome
mail from the developers.
Our new database (and other files) will be placed
in your .bauble or
.ghini
directories. |
 |
We are now at the point
where we can enter our first data.
[1]
Included is RBG Kew's
Family and Genera list from Vascular Plant Families
and Genera compiled by R. K. Brummitt and published
by the Royal Botanic Gardens, Kew in 1992 used by
permission of RBG Kew.
Entering data
Adding Species
I have picked out one of
my plants to use as an example entry. It was labelled
Scilla violacea when
purchased from a local garden centre on 22 Feb 2016 and
I re-potted it on 26 Feb 2016.
Note: It is very tempting
to add a new plant starting by adding either a
Family or Genus but as these fields are
very well populated already this would be a
mistake.
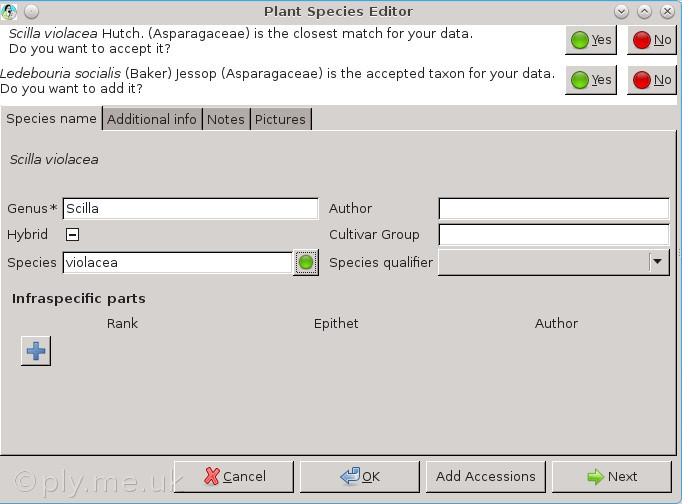
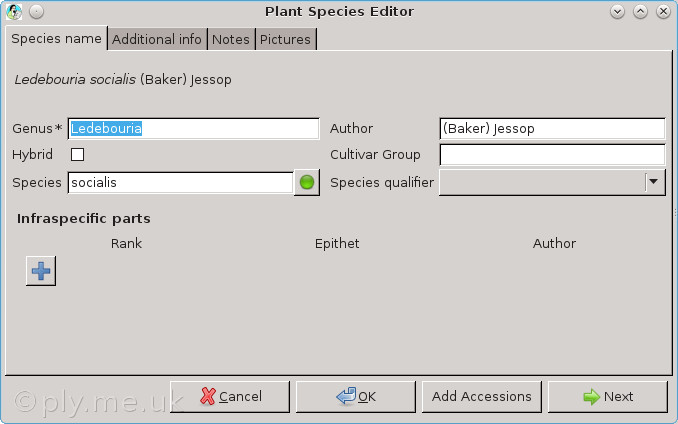
We start from Insert -> Species.
Enter violacea in
the Species field and start to type
Scilla in the
Genus field. As we type each letter a
list of possible matches will be shown, the
more we type the fewer the available choices,
we select Scilla.
Clicking the green button checks the entry
against The Plant
List database and gives us the option of
adding additional data as shown here.
The first suggestion adds author information to
this entry, the second will add Ledebouria socialis, the
officially correct name for Scilla violacea, as another
species in our database. We are going to accept
both of these suggestions.
Infraspecific parts allows entry of
subsp., var. etc.,
self-explanatory I'm sure but see
here for more information.
- Note: I came across an issue
adding Gymnocalycium
damsii in that the query responds
No match found on
ThePlantList.org.
- The Plant
List does in fact have an entry for
Gymnocalycium
damsii but it is listed as synonym of
Gymnocalycium
anisitsii subsp. damsii. The version I am
using at present does not support this type
of query - or produce a very informative
response.
- A future version will likely address this
but may still inform you that it cannot
handle this type of query.
- The solution is to add Gymnocalycium anisitsii
supsp. damsii and
set Gymnocalycium
damsii as a synonym, a little manual
intervention but produces the correct
result.
|
 |
This shows a cropped dialogue
image with the author data added.
At this point we could click OK to
complete the entry, or click Add
Accessions to add a specimen actually in our
collection or Next to add another
Species but let's take a look at the other
tabs first. |
 |
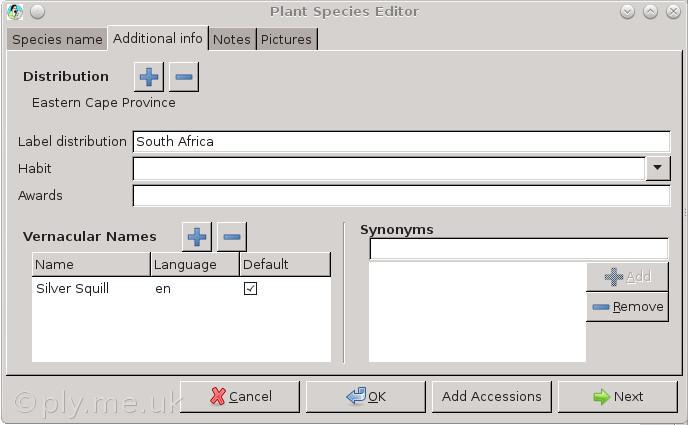
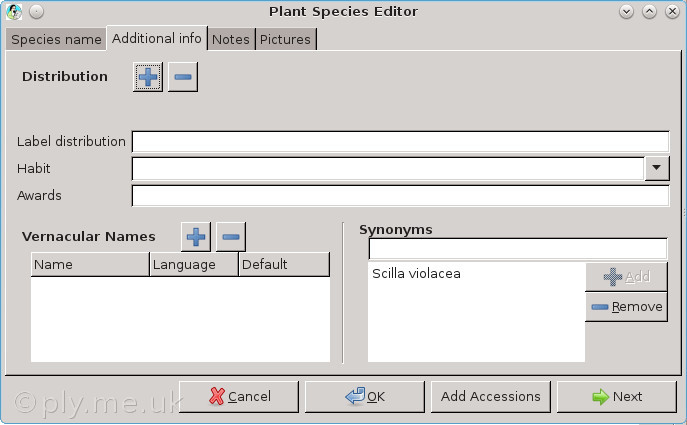
This is the Additional
info tab and as you can see I have added a
few entries.
Label distribution is a field for data to
be printed on labels and need not be as
geographically specific as
Distribution.
Habit I have found of little use for my
own plants (I haven't found a source of
definitive botanical information relating to
cacti and succulents as yet).
Vernacular Names allows entry of common
names in various languages.
Synonyms is of more interest to us (note
that this field will only accept an entry of
another species in our database).
We will take a look at this field in a moment but
now we click OK to enter this
Species and the data we have added into
our database. |
 |
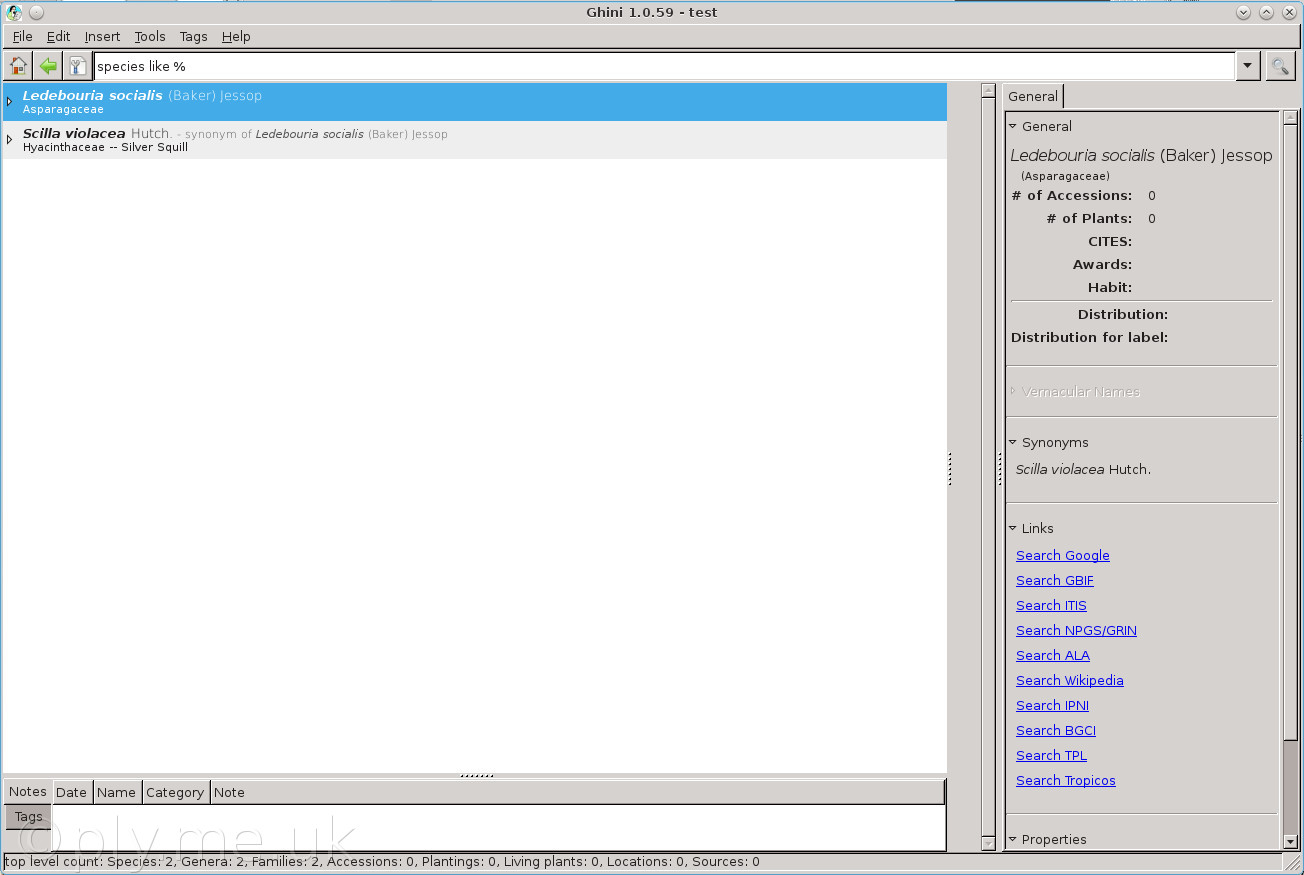
Earlier we accepted the
option to add Ledebouria
socialis to the database, so we should now
have two Species entries in total,
Scilla violacea and
Ledebouria
socialis.
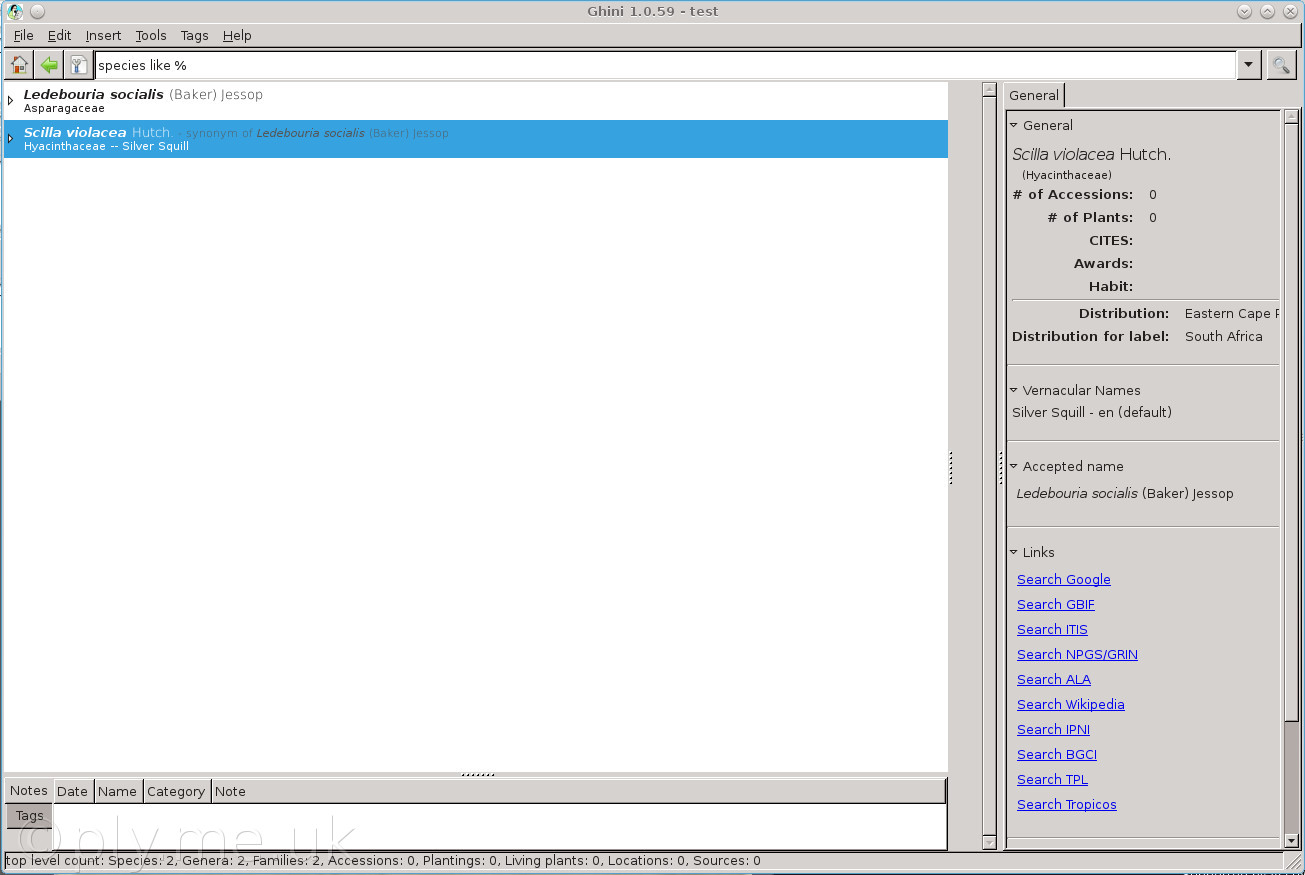
Checking the Home screen we now see
2 in the Species line, clicking on
the 2 should show the Species
screen with entries for both Scilla violacea and Ledebouria socialis.
|
 |
We can see here that
Scilla violacea has
been added as a synonym of Ledebouria socialis (this is a
clickable link).
|
 |
Let's take a look at the
Edit dialogue for Ledebouria socialis.
Note the author field has already been
auto-filled by ghini
as the Species was added. |
 |
Scilla
violacea has been entered as a synonym
within the Synonyms field.
We can add Distribution and Vernacular
Names data to this entry if we so
desire. |
 |
Notes and
Pictures tabs are probably self-explanatory but
we will look more closely at Notes in the
Insert -> Plant section.
Click OK to add
the species to our database and close the dialogue
window.
Adding Accessions
Accession is a
term I had not come across previously in terms of
plants and collections but it is very important in
botanical cataloguing. The simplest definition would
seem to be that a unique specimen group is called an
Accession.
I have been using
Accession for my acquisition of a plant. Each
plant in my collection has come from somewhere, a
nursery, garden centre, shop, another collector etc. As
such it is unique from any specimen of the same species
obtained elsewhere or at another time.
If I obtain another plant
of the same species as one I have already then I treat
it as another Accession unless multiples are
obtained at the same time and from the same place.
A better description of
Accession and some some of the other terms and
how it all fits together is given in this PDF
document from the National Botanic Gardens,
Glasnevin, Dublin, Ireland.
Our Home screen now
looks like this.
Note the non-grey numerics in the various
columns. These numerics are links to other
screens. |
|
| Clicking on the number
2 in the Species line with first
entry highlighted. |
|
| The second entry
highlighted. |
 |
An Accession can be added using any of
the following methods
- Insert -> Accession
- Add Accession from the highlighted
entry in the Species screen
- from the Species editor
dialogue.
In our particular case, as we have a
synonymous name, choosing which species entry
to add the Accession to depends on how
we wish to label or catalogue your plants. We
will stick with Scilla
violacea in this example. (It is very
easy to switch from an entry to its synonym
from links within the Species
screen.)
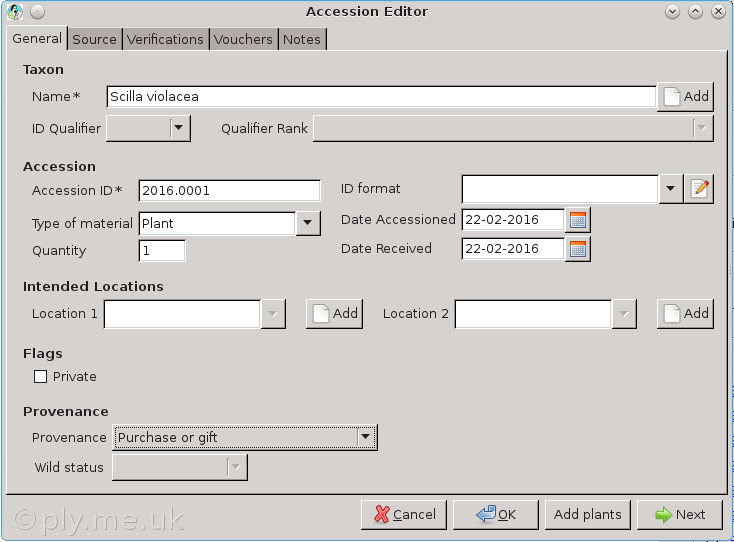
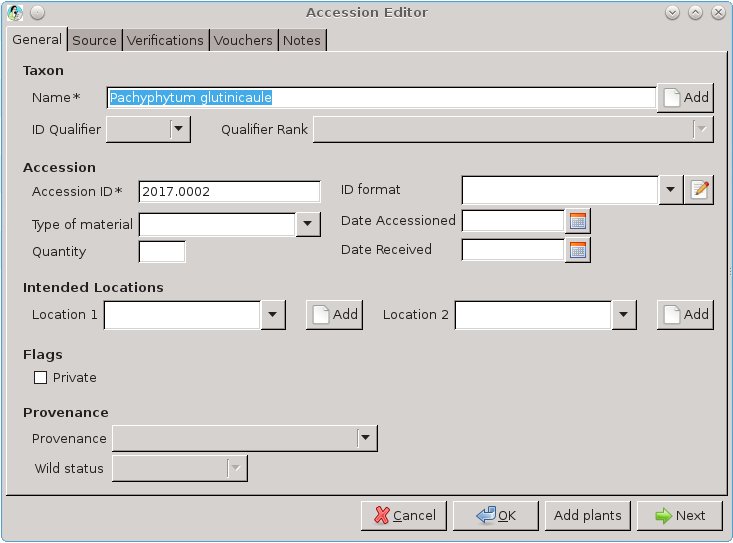
The first part of Accession ID can be
usefully changed to suit the year we acquired
this specimen. The second part will increment
as we add a new Accession.
Date Accessioned and Date
Received I set to the date a specimen
entered my collection, invariably they are the
same. (If I don't have an exact date for some
older specimens I use a date such as
01-01-2015.)
Note: Accession ID can be changed in
later edits if desired and this change will be
reflected in all Plants under this
Accession.
The new Accession ID must be unique!
|
 |
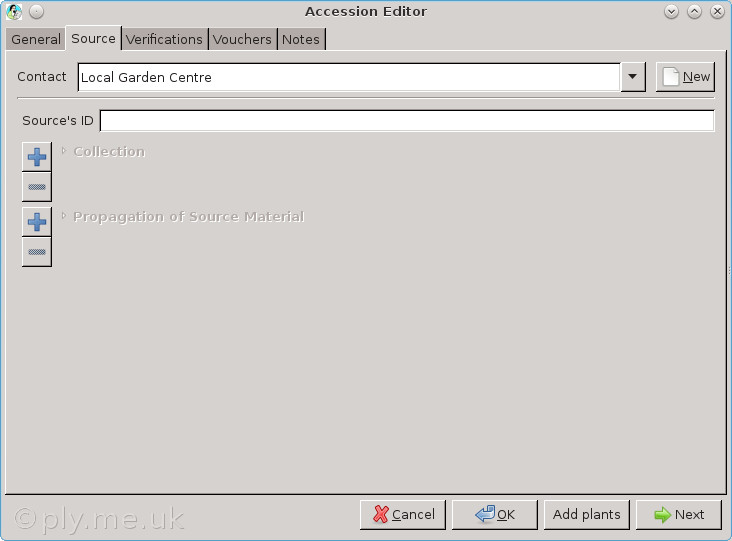
The Source tab allows
us to add details of where we obtained our
specimen. We haven't entered any Sources
so far so click on New and enter details
as required.
|
 |
On clicking OK the new
entry will appear in the main Contact
field and be available in a drop-down list in
future Source entries.
The Verifications and Vouchers tabs
are not really of use to us as gardeners or
collectors. |
 |
Adding Plants
A Plant can be
added using one of the following methods
- Insert -> Plant
- Add Plant from the highlighted entry in
the Accessions screen
- from the Accessions editor dialogue
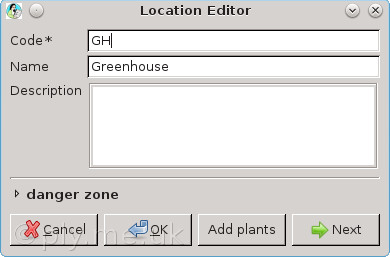
Adding a Plant
requires a defined Location ie. where it is
physically placed, if no Locations have been
defined as we add our first Plant then a prompt
will open a dialogue.
Enter a suitable location name, perhaps Greenhouse and code GH (this dialogue provides yet another
way to add a Plant.).
New location dialogue.
|
 |
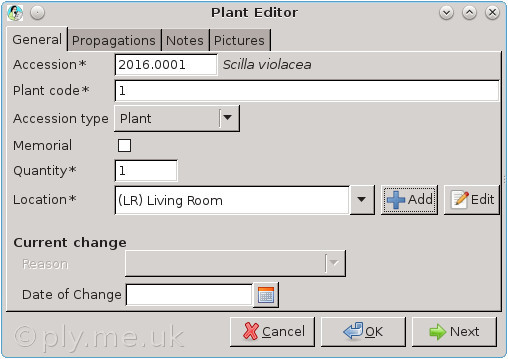
This is the main Plant
editor screen.
Accession is the ID created at the point
of adding the Accession
Plant code usually starts at 1 in each
Accession and auto-increments.
Quantity is usually 1 however sometimes
there may be more than one plant in a pot, leaves
or stems may break off that can be treated as
vegetative parts or we may acquire more than one
of a species from the same Source at the
same time.
A number greater than 1 will add more than 1
Plant entries (this does not seem to be
consistent at present - or perhaps it was just my
imagination that it happened once).
You may notice in this image that for
Location I have used Living Room not Greenhouse as entered
earlier.
I always try and quarantine new plants before
mixing them with the rest and often they are
quarantined on my living room window
cill.
|
 |
The Propagation tab
can be used to record specific details when
propagating a plant.
|
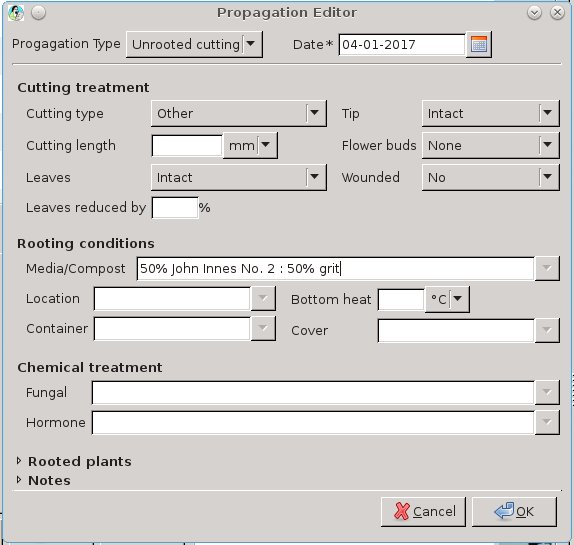 |
| This is how the
Propagation tab looks after filling in the
above details. |
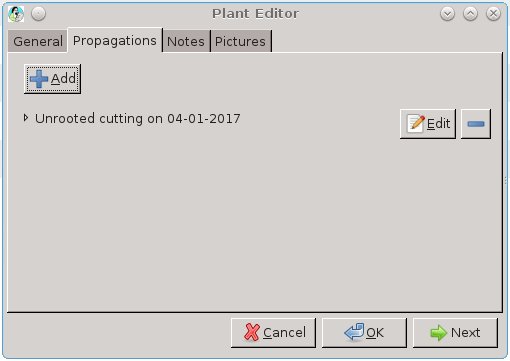 |
| The newly propagated plant is
a new Accession and requires
creating. |
 |
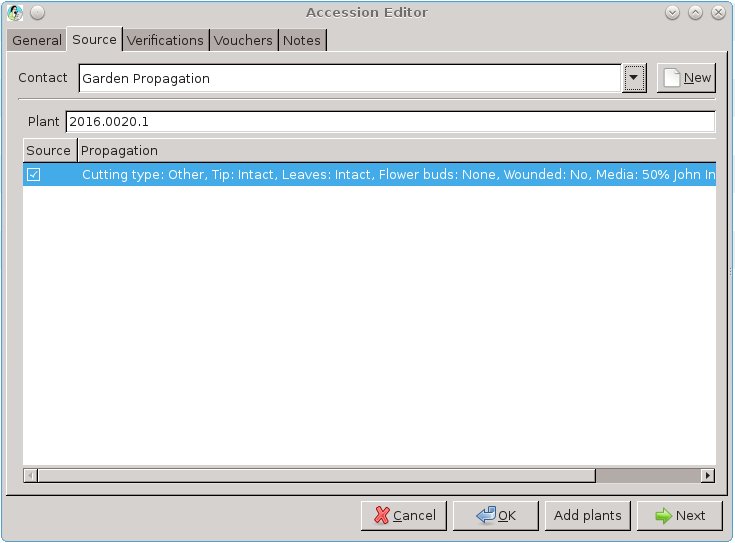
| The Source of this new
new Accession is Garden Propagation
and Plant ID refers back to the parent
plant whose propagation details we filled in
earlier. |
 |
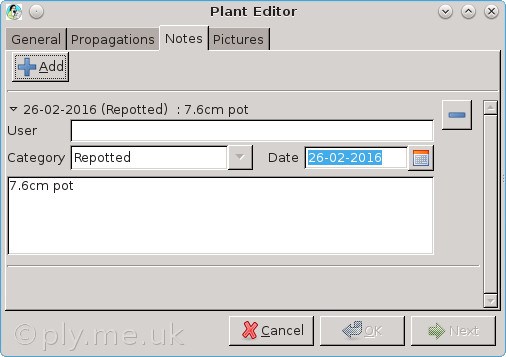
The Notes editor
screen where we can add any number of notes.
It is probably of little worth entering anything
in the User field if we are the only
person likely to be using our database.
A Category must be entered, this can be
anything you like. This new Category will
be added to a drop-down list in future
Notes.
The text of our Note is added below.
If a URL is entered in a Note it will be
available as a clickable link in the appropriate
main screen (I use Category name
Web for these).
Note: The Notes dialogue is similar for
Family, Genus, Species and
Accession but the Note and
drop-down list of Categories will be
unique to each.
The Pictures tab allows addition of
images, see the documentation.
Pictures can also be added to
Species entries.
They will be displayed in the centre section of
the Species and other screens - this may
require dragging the section border across to
expose. |
 |
Results so far
We have now run through
the basic features so let's take a look at the
results.
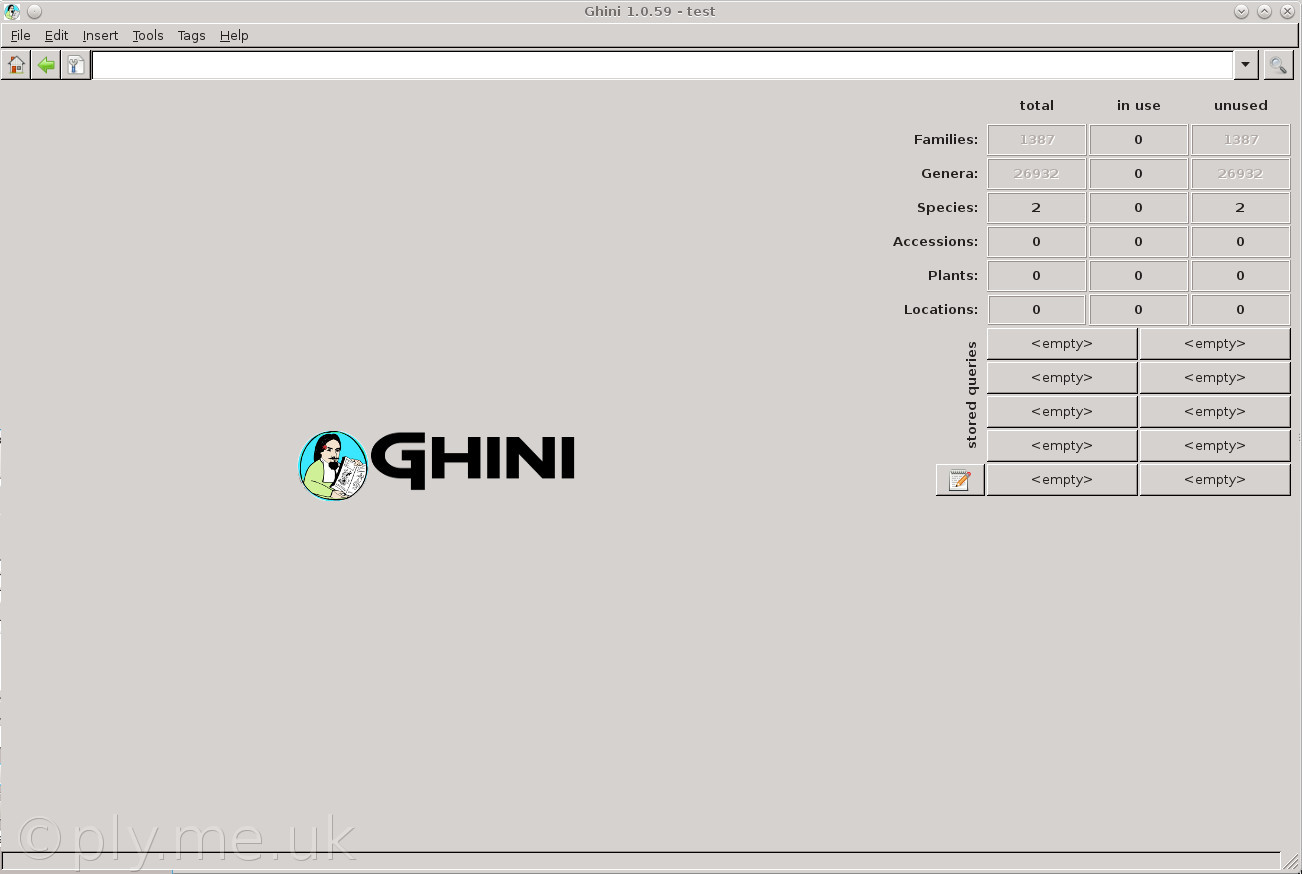
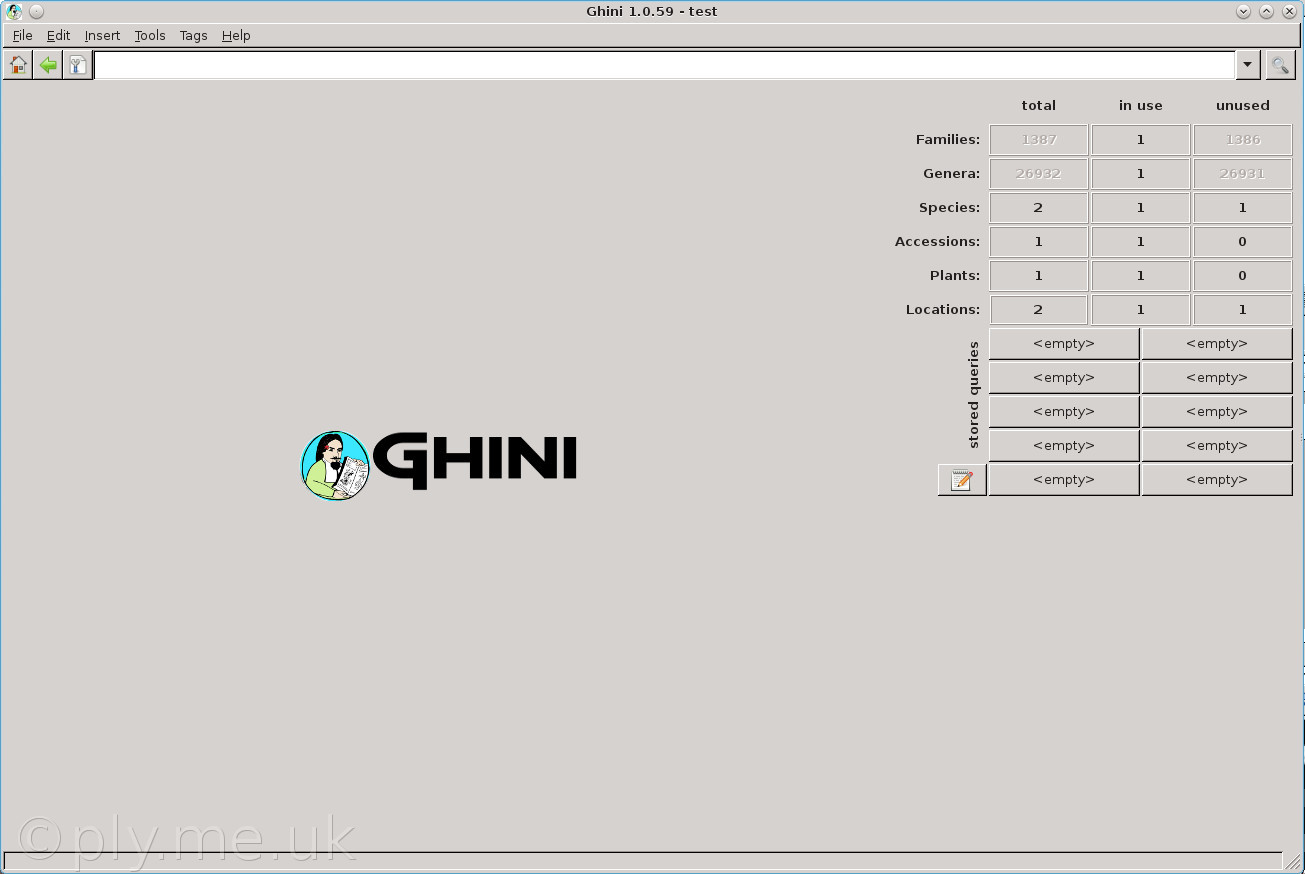
The Home screen shows
our entries.
Any field with a non-grey numeric value the
total, in use or unused
columns can be clicked on to take us to the
relevant list of included items.
A search term can be entered in the search field
at the top of the window. Try scilla for example or
2016.
|
 |
stored queries are a
little more complicated, see the documentation.
Here is a stored query that I use
frequently, it is based on a result from the
Query Builder (see the Home screen)
but note that notes.date does not actually
appear within the Query Builder dialogue
and has to be added manually.
The query searches for all Plants that
have a Note containing the Category
Repotted and a date
later than 2016-06-01. It displays a list of all
matching Plants. (The date can be edited
from command line as well as the stored
queries edit dialogue.) |
 |
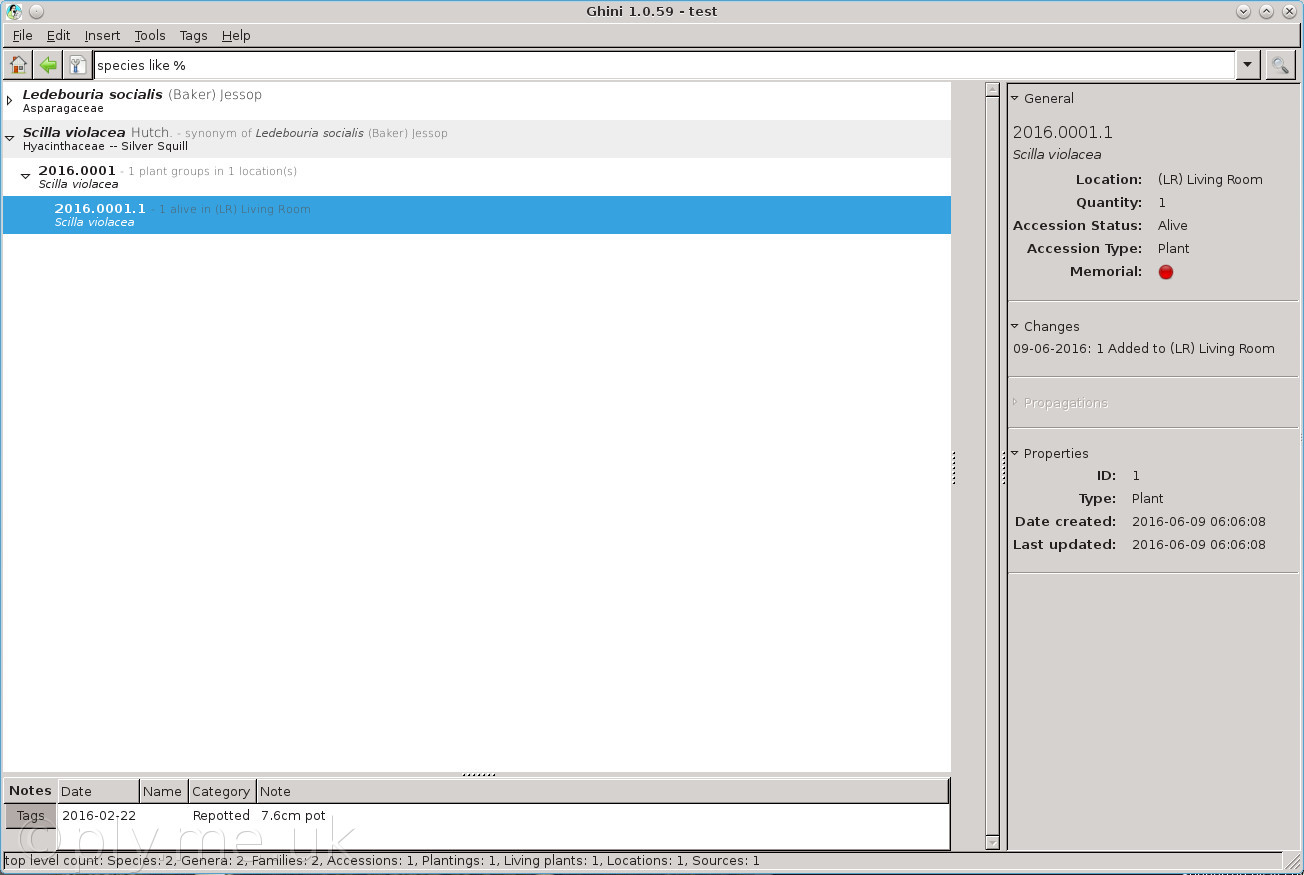
This is the Species
screen as linked from the Home screen.
We see the two species we have entered, the
Scilla entry has been
expanded using the arrow head markers to the
left. This shows any Accessions and
Plants, these items can be edited.
Note that there is a currently hidden pane in the
centre that can be expanded by dragging to show
any Pictures added to our various
entries. |
 |
This is an image of the label
format I currently use for 12mm wide tapes.
The barcode is generated from the Plant ID
(I use QRencode for its compactness) and Plant
ID is repeated in human-readable form beneath
the textual binomial.
With the cursor placed in the search field of the
Home screen, scanning a barcoded label
will immediately show me the relevant
Plant.
Note: I create a csv file suitable for label
printing from a slightly modified plant_list
Report, adding quotes and a comma field
delimiter for each field. The text can be
extracted from the generated pdf Report
file and massaged if need in a text editor. |
 |
Reports
The included
Reports are rather basic but good enough to
produce plant lists and simple labels.
The .xsl templates can be edited and other fields added
but this may mean searching through the install files
to find a list of useful/usable field-names.
There is also the possibility of using the Mako
Report Formatter but I haven't played with that at
all so far.
Additional notes
If we set a
Plant's Quantity as 0 as perhaps
we no longer have it in our collection (we could also
mark as Dead or Given Away etc.) its
highlighted colour will change in the Plant
screen.
It is possible to change
the Species of a Plant very easily.
For example: perhaps we have sown some seed and one
emerges as a stinging nettle (Urtica dioica)!
We would first have to Add Accession for
Urtica dioica then,
remembering its Accession ID, use that in place
of the Accession ID shown in the Plant
edit dialogue, its Plant code will remain the
same but can also be changed as long as it is
unique.
See also
The official ghini
documentation
python
bauble 1.0.52
Belize
Botanic Gardens bauble page
bauble
googlegroups contains a lot of hints and tips
Reporting of ghini
issues
There are also several videos on youtube demonstrating
various features of bauble...
|